How To Create Modals with Unique Routes in Next.js: A Guide to Intercepting Routes
Discover how to render multiple pages within the same layout and display content without changing the context.
In this guide you'll learn the following:
What is a Modal?
The Significance of a modal to users' experiences.
What are Intercepting Routes?
How to create a modal in Next.js using intercepting routes.
This article provides an in-depth guide on how to create modals with unique routes using intercepting routes in Next.js. Discover how to render multiple pages within the same layout and display content without changing the context.
What is a Modal?
A modal, often called a modal dialogue or just a modal window, is an interactive window that appears on a web page to display a message or prompt a user to act. A modal can be displayed in response to a user's action, such as clicking a button or a link. However, sometimes a modal can be displayed just to capture the attention of a user to specific information on a site without any interaction at all.
How Modals Improve Users' Experience Within an Application.
Modals improve the users' experience in many ways. Modals capture the attention of users and establish a feeling of flow and continuity in the users' minds. A user can access information or complete a task using modals without ever leaving the main screen or context. This greatly helps in maintaining the user's mental picture and initial orientation of the page while reducing the number of page navigations.
When a modal is displayed, it overlays the existing content on the web page. The content on the rest of the page is partially darkened or blurred hence driving the user's attention to the information or instructions displayed on the modal.
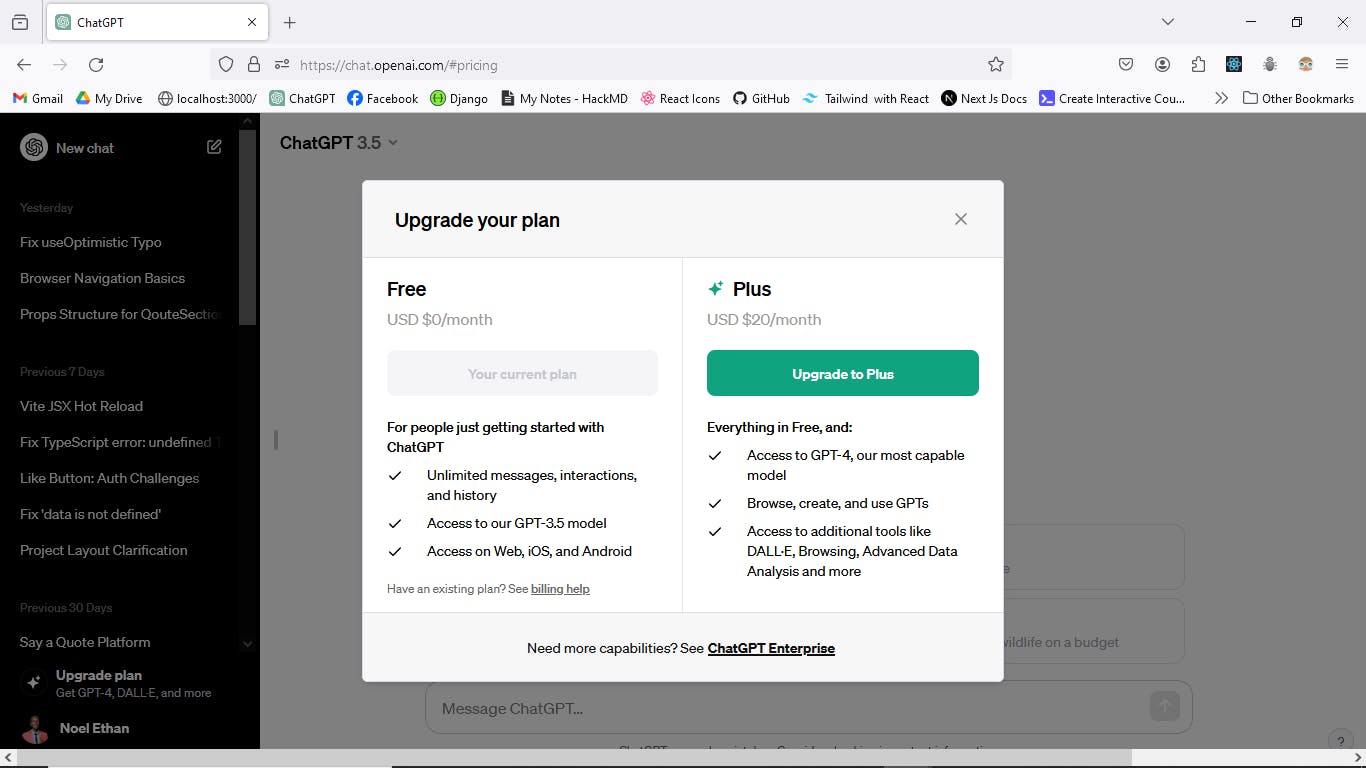
For example, in ChatGPT 3.5, when a logged-in user clicks the Upgrade Plan button that is found on the bottom of the left-side NavBar, a modal pops up displaying the tiers offered by Open AI. A user can interact with the modal by upgrading the plan or closing the modal.

In the above screenshot, the modal has a unique URL, as observed in the browser search bar input on the top. This URL can be copied, shared, or bookmarked for easy access. If you log in to chatGPT, you can paste this link https://chat.openai.com/#pricing in any browser tab and it will take you straight to the Modal.
How to Create a Modal in Next.js.
There are several scenarios in which developing an application in Next.js or any other framework out there can require you to employ a modal. A few of the scenarios include:
Login page: You can use a modal to display a login form that pops up when the user clicks on a button or a link, without leaving the current page. This can improve the user experience and reduce the loading time.
Image gallery: You can use a modal to show a larger version of an image that the user selects from a grid or a list, with some additional information or options. This can create a more immersive and interactive experience for the user.
Confirmation dialog: You can use a modal to ask the user to confirm an important or irreversible action, such as deleting an item, submitting a form, or logging out. This can prevent accidental mistakes and provide feedback to the user.
Logically, each of the examples above will need to have its own special route. For example, the login modal will require a special route that will display without leaving the main page. Having a unique route for the login modal will allow users who may have the login link for your application to simply paste the link in their browser's search bar and be taken to the login page instead of having to navigate to the main page first and click the login button or link to display the login modal. In the same way, as you did with the ChatGPT 3.5 pricing link above.
In Next.js this can be created and achieved by using Intercepting routes. Let's explore this advanced routing pattern in greater detail.
How to Create Intercepting Routes in Next.js
Intercepting routes allows you to load a route from another part of your application within the current layout. Intercepting routes enable you to display the content of another segment without the user switching the context.
A segment is a part of a route that corresponds to a folder in your file system. For example, the route
/blog/posthas two segments:blogandpost.
Just as the name suggests, intercepting routes intercept an already existing route that has its own context or layout. The Intercepting route then renders within another context or layout. For example, you may have a login page that renders on its own context and layout, however, if you want the same login page to render within the Home page layout as a modal, you create a login intercepting route within the Home page layout.
To load a route from another part of your application within another layout, you define the intercepting route with (..) convention. This symbol signifies that this route is intercepting a segment one level above it.
You can use:
(.) to match segment on the same level
(..) to match segment one level above
(..)(..) to match segment two levels above
(...) to match segment from the root app directory
Implementing Intercepting Routes In Next.js
To gain a greater understanding of Intercepting routes, let's build an application that allows users to add and share inspiring and motivational quotes. The home page will render a list of quotes and a button that prompts users to add a new quote to the site. When a user clicks on this button a Modal containing a form will display, to enable the user to add and share a new motivational quote.
In essence, this is one of the projects that I built, using Next.js 14, Shadcn UI and Firebase. You can view the application and share your motivational quotes too by clicking here^.
Step 1. Getting Started
a. Creating a New Project
To create a Next.js app, open your terminal, cd into the folder you'd like to keep your project, and run the following command:
npx create-next-app@latest nextjs-modal --use-npm --example "https://github.com/NoelEthanC/say-a-qoute-app/tree/starter-project"
Note:
This command uses
create-next-app, a Command Line Interface (CLI) tool that sets up a Next.js application for you. In the command above, you're also using the --example flag with the starter example template for this article.
b. Exploring the project.
After installation, open the project in your code editor and navigate to nextjs-modal.
cd nextjs-modal
c. Folder Structure
You'll notice that the project has the following folder structure as it uses the app router.
nextjs-modal/
├── node_modules
├── public
├── src/
│   ├── app/
│   │   ├── add-quote/
│   │   │   └── page.tsx
│   │   ├── default.tsx
│   │   ├── layout.tsx
│   │   └── page.tsx
│   ├── components
│   ├── lib
│   └── providers
├── package.json
└── ...
Here is a brief explanation of some of the files and folders you will use in this tutorial:
nextjs-modal/: The root folder of the application.public/: The folder that serves static files such as images, fonts, etc.src/: The folder that contains the source code of the application.app/: The folder that contains the pages and layouts of the application.add-quote/: The route that contains the page for adding a new quote to the application.default.tsx: The file that exports the default component for the app layout. This component will render the main content of the application, such as the list of quotes.layout.tsx: The file that exports the layout component for the app. This component will render the common elements of the application, such as the header and the footer. It will also accept the modal slot as a prop and render it if it exists.components/: The folder that contains the reusable components of the application, such as the quote card, the modal, etc.Config Files: You'll also notice config files such as
next.config.js,firebase.tsand.env.localat the root of your application. Most of these files were created and configured when building the project. Feel free to add your own firebase credentials and have the application up and running.
Note: Typescript
You may also notice most files have a
.tsor.tsxsuffix. This is because the project is written in TypeScript. My goal was to make a tutorial that is reflective of the state of the web today.Don't worry, If you are unfamiliar with TypeScript, I'll provide you the typescript snippets of code as needed.
d. Running the development server
Run
npm ito install the project's packages.Followed by
npm run devto start the development server.
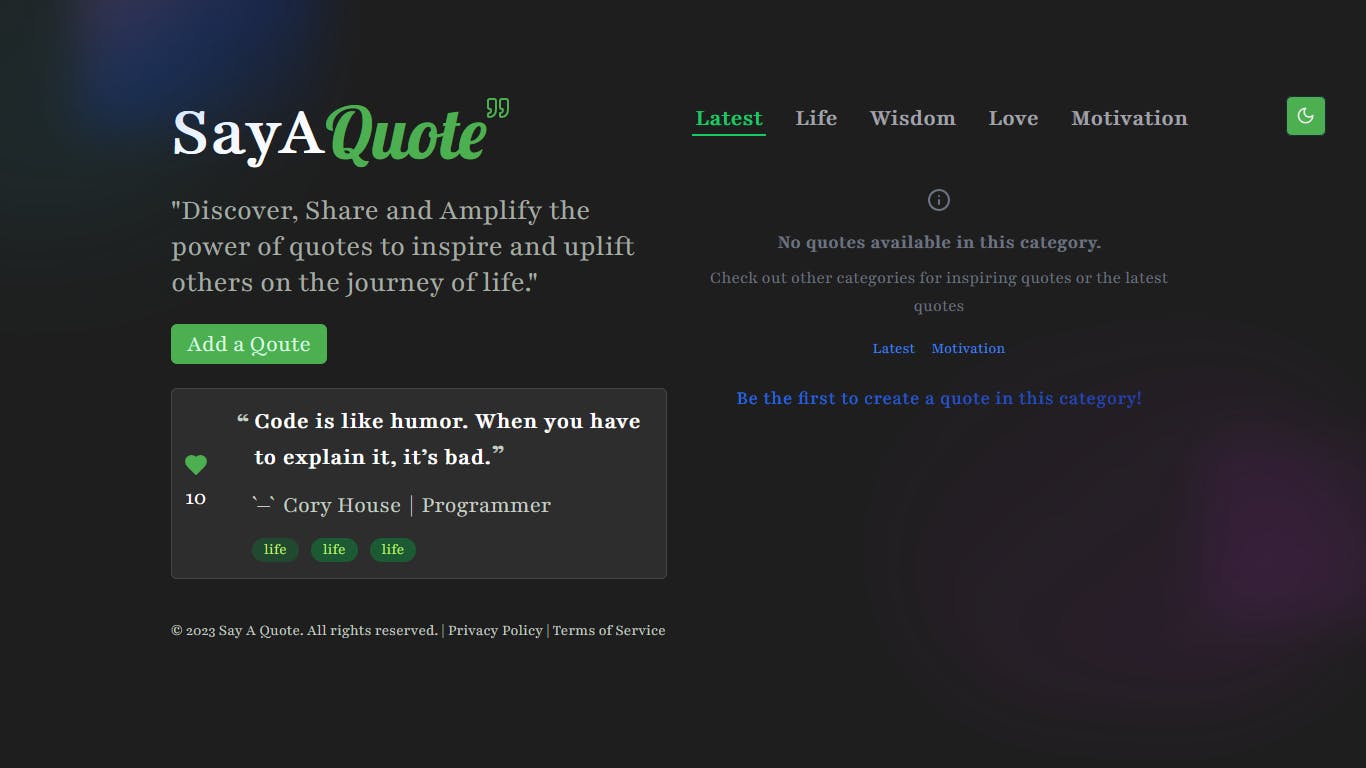
The npm run dev command, starts your Next.js development server on port 3000. Let's check to see if it's working. Open http://localhost:3000 on your browser. Your home page should look like this:

Step 2. Creating intercepting routes.
In this section, you will create an intercepting route for the add-quote route so that it should be rendered without leaving Home page context.
The folder structure for this section will look like this:
nextjs-modal/
├── node_modules
├── public
├── src/
│   ├── app/
│   │   ├── @modal/   // slot
│   │   │   ├── (.)add-quote/ //intercepting route
│   │   │   │   └── page.tsx
│   │   │   └── default.tsx
│   │   ├── add-quote/
│   │   │   └── page.tsx
│   │   ├── default.tsx
│   │   ├── layout.tsx
│   │   └── page.tsx
│   ├── components
│   ├── lib
│   └── providers
├── package.json
└── ...
To create an intercepting route, do the following:
Firstly, define a slot called
@modalinside the app folder. A slot is defined as a folder that begins with the@symbol.Inside the
@modalfolder , do the following:
- Create a file called
default.tsx. Add the following code in thedefault.tsx:
export default function Default() {
  return null;
}
Create a folder with the following name
(.)add-quote. This folder represents an intercepting route for theadd-quoteroute.- Inside the
(.)add-quotefolder, create a file calledpage.tsxand add the following code.
- Inside the
"use client";
import { Dialog, DialogContent } from "@/components/ui/dialog";
import { useRouter } from "next/navigation";
import {
  Card,
  CardContent,
  CardDescription,
  CardHeader,
  CardTitle,
} from "@/components/ui/card";
import AddQuoteFormModal from "@/components/general/AddQuoteFormModal";

const AddQuoteModal = () => {
  const router = useRouter();
  return (
    <Dialog open={true} onOpenChange={() => router.back()}>
      <DialogContent className="lg:w-[700px] bg-transparent border-0 text-transparent ">
        <Card className="bg-light-gray-800 dark:bg-dark-gray-800 border border-light-gray-700 dark:border-dark-gray-700 lg:w-[550px]">
          <CardHeader className="text-2xl">
            <CardTitle className="text-4xl">Add A Quote</CardTitle>
            <CardDescription className="text-xl">
              Add a quote to our list of quotes with one click.
            </CardDescription>
          </CardHeader>
          <CardContent>
            <AddQuoteFormModal />
          </CardContent>
        </Card>
      </DialogContent>
    </Dialog>
  );
};

export default AddQuoteModal;
The code above uses components from a UI library called Shadcn UI. To display a modal, a Dialog component has been used and has been set to always open. You can customize the modal component in any way using tailwind css .
The component above, renders a form component called AddQuoteFormModal that will enable a user to add a quote. You can view this component by opening /src/components/general/AddQuoteFormModal.tsx file.
Step 3. Integrating the Intercepting Route in the Home Layout
After creating the intercepting route within the application. It is important to add it to the Layout component that needs to display the route.
To add the route, use a slot to add the intercepting route to the layout. this will signify Next.js to know that it will receive another route in its Layout and it should render that route seamlessly.
To enable the layout to render the modal, do the following:
- Replace the code inside the src/app/layout.tsx file with the following code:
import type { Metadata } from "next";
import "./globals.css";
import { playfair } from "@/lib/fonts";
import { NextUIProviders } from "@/providers/NextUIprovider";
import { ThemeProvider } from "@/providers/ThemeProvider";
import GhostVerticalText from "@/components/general/GhostVerticalText";
import { NextJSBlob, SaqGreenBlob } from "@/components/general/GlowingBlobs";
import { ModeToggle } from "@/components/general/ThemeToggle";
import { Toaster } from "@/components/ui/toaster";
import clsx from "clsx";

export const metadata: Metadata = {
  title: "Say a Qoute",
  description: "Generated by create next app",
};

export default function RootLayout(props: { children: React.ReactNode }) {
  return (
    <html lang="en">
      <body
        className={clsx(
          playfair.className,
          "bg-light-gray-700  dark:bg-dark-gray-900 "
        )}
      >
        <ThemeProvider attribute="class" defaultTheme="dark">
          <NextUIProviders>
            <ModeToggle />
            <GhostVerticalText />
            <NextJSBlob />
            <SaqGreenBlob />
            <>
              <Toaster />
              {props.children}
            </>
          </NextUIProviders>
        </ThemeProvider>
      </body>
    </html>
  );
}
- Save the file and refresh the browser.
Step 4. Rendering the Modal
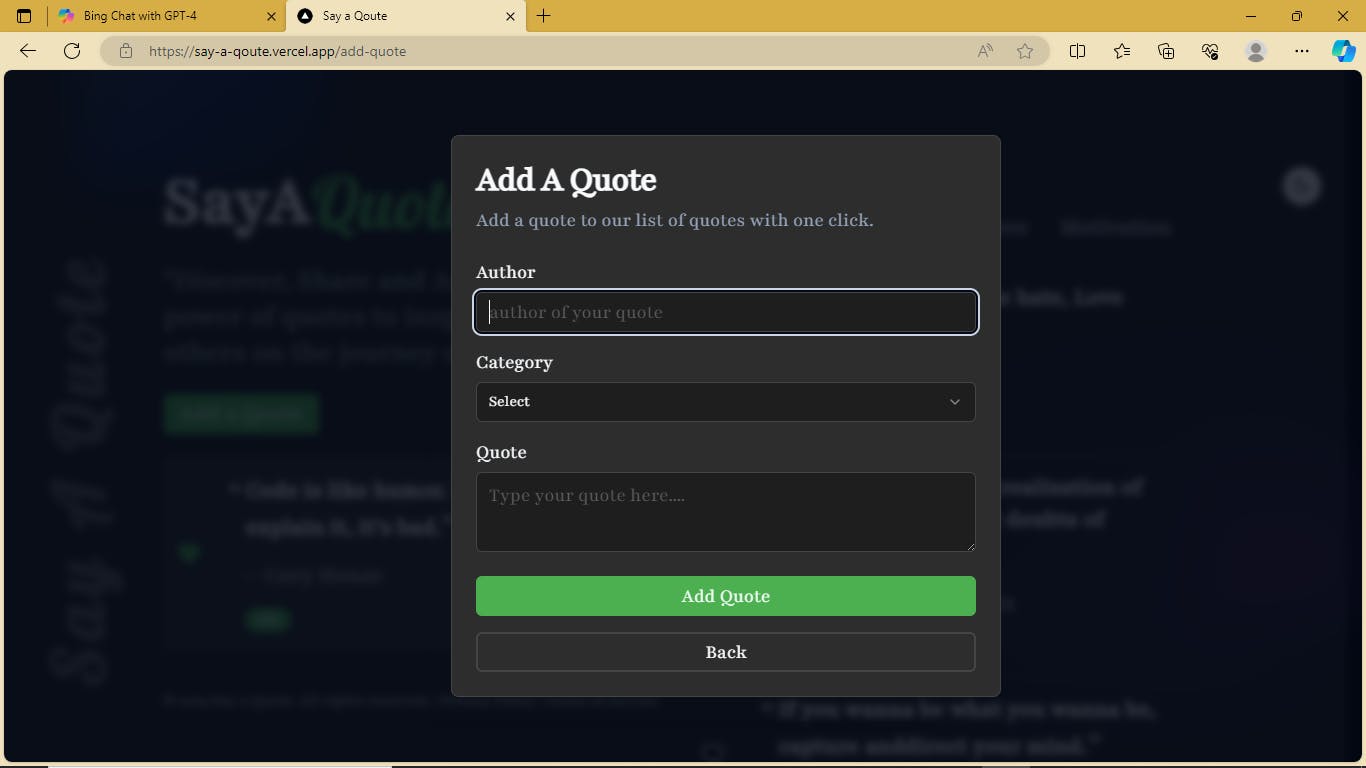
After refreshing the browser, Click the green button, on the Home page which says Add a Quote and see the modal pop up. When the modal pops up check the URL in the search bar and you will see this link: localhost:3000/add-quote . This means that the modal has a unique route and you can navigate to it easily by typing in the link.
Here is how the modal is supposed to look like in the project:
You may also check it by going to the live application via this link:

NOTE: In Next.js if you enter the link manually, the modal does not show hence the actual route is displayed. You can test this by manually entering the route in the browser's search bar and see the actual add-quote route.
Conclusion.
Congratulations! I hope that by creating and displaying an intercepting route, you have been able to grasp the idea of intercepting routes in more depth. This article has discussed modals and how they enhance an application's user experience. It has also gone into great detail to describe how to create modals with shareable, unique links in Next.js. Please feel free to ask any questions you may have in the comments section below or by contacting me on LinkedIn or Twitter (see my profile for the handles).
